 XfyCoding博客
来聊聊Java常用集合类HashMap
HashMap简介
HashMap是我们比较常用的集合类型,它是以键值对的逻辑结构来存储数据的。
- HashMap允许存储
null键或者null值的键值对。 - HashMap非线程安全。
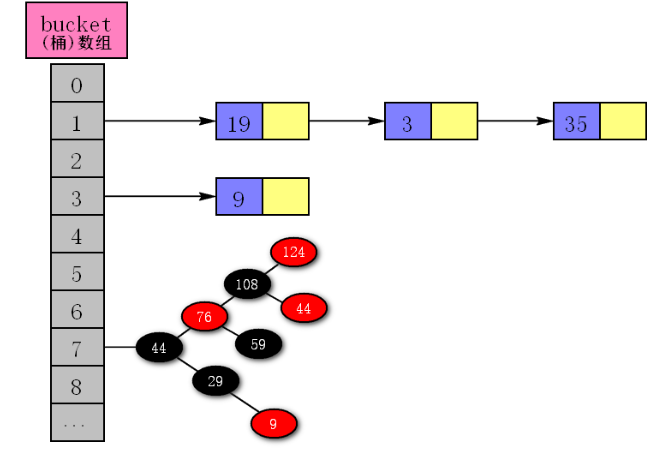
- HashMap底层初始化用的是数组+链表,当链表长度大于8(默认值)时,若size小于64则进行2倍扩容,反之会对对应的数组桶进行链表转红黑树操作。
- HashMap默认大小为16。
不同版本的HashMap底层数据结构
JDK1.8 之前
底层采用数组+链表,用(n - 1) & hash找到数组索引位置,若冲突则用拉链法解决冲突。
JDK1.8 之后
底层采用数组+链表作为初始结构,当某个桶链表长度大于8时,默认情况下,会判断数组长度是否小于64,若小于64则使用resize()进行扩容。反之调用treeifyBin()转红黑树。
HashMap是如何解决哈希冲突的?
在JDK7之前HashMap采用的是链式寻址法解决哈希冲突的,而JDK8之后则未转红黑树前采用的就是`链式寻址法,转红黑树之后就借用红黑树天然有序性解决哈希冲突,根据比对哈希值进行插入。
为什么1.8之后要加一个链表转红黑树的操作
链表查询的时间复杂度为O(n)在数据量较少的情况下查询效率不错,一旦冲突非常厉害,链表数量暴增的话查询效率或者添加效率都会十分低下,所以就需要转为红黑树,通过黑平衡结构保证插入和查询效率都为O(logN),并且红黑树是黑平衡树,所以相较于AVL不会进行频繁的翻转保证平衡的操作。
HashMap底层的数据结构红黑树算法在大数据情况下最大高度可能是多少呢?
理想情况为2log2 (n+1),但是Java中这个情况考虑的因素就很多了:
- 得看看堆区大小以及这个节点的大小。
- 就Java而言这种情况很少见,如果大数据都在一个bucket中,就说明设置的哈希算法有问题了。
HashMap几种构造方法
默认构造函数的初始化流程
如下所示,仅仅初始化负载因子,默认为0.75f,这个负载因子的作用即当当前数组大小>数组容量*负载因子时会进行扩容操作。
public HashMap() {
	this.loadFactor = 0.75F;
}将另一个Map存到当前Map中的构造函数工作流程
该方法会将阈值设置为默认值DEFAULT_LOAD_FACTOR(0.75f),然后将传入的map通过putMapEntries方法将键值对逐个存入。
public HashMap(Map <? extends K, ? extends V > m) {
    this.loadFactor = DEFAULT_LOAD_FACTOR;
    putMapEntries(m, false);
}指定初始化容量的HashMap
通过外部参数传入initialCapacity,初始化map底层数据的大小。
public HashMap(int initialCapacity) {
    this(initialCapacity, DEFAULT_LOAD_FACTOR);
}指定容量和负载因子的构造函数
public HashMap(int initialCapacity, float loadFactor) {
    if (initialCapacity < 0)
        throw new IllegalArgumentException("Illegal initial capacity: " + initialCapacity);
    if (initialCapacity > MAXIMUM_CAPACITY)
        initialCapacity = MAXIMUM_CAPACITY;
    if (loadFactor <= 0 || Float.isNaN(loadFactor))
        throw new IllegalArgumentException("Illegal load factor: " + loadFactor);
    this.loadFactor = loadFactor;
    this.threshold = tableSizeFor(initialCapacity);
}HashMap核心源码详解
HashMap对应put方法工作流程
HashMap的put方法的逻辑比较清晰,大体的逻辑为:
- 通过hash算法得到桶的位置
- 尝试将键值对存到hash计算后的桶的位置中
- 无冲突直接创建新节点保存
- 有冲突则按照链表或者红黑树的逻辑进行插入。
入口代码
public V put(K key, V value) {
    return putVal(hash(key), key, value, false, true);
}进入putVal,可以看到要做的就是计算出桶的位置然后完成插入。
final V putVal(int hash, K key, V value, boolean onlyIfAbsent,
    boolean evict) {
    Node < K, V > [] tab;
    Node < K, V > p;
    int n, i;
    // table未初始化或者长度为0,进行扩容
    if ((tab = table) == null || (n = tab.length) == 0)
        n = (tab = resize()).length;

    //计算(n - 1) & hash并查看是否在桶中,若不在则直接创建一个结点放到这个桶中
    if ((p = tab[i = (n - 1) & hash]) == null)
        tab[i] = newNode(hash, key, value, null);

    // 桶中已经存在元素(处理hash冲突)
    else {
        Node < K, V > e;
        K k;
        // 判断table[i]中的元素是否与插入的key一样,若相同那就直接使用插入的值p替换掉旧的值e。
        if (p.hash == hash &&
            ((k = p.key) == key || (key != null && key.equals(k))))
            e = p;

        // 判断插入的是否是红黑树节点
        else if (p instanceof TreeNode)
        // 放入树中
            e = ((TreeNode < K, V > ) p).putTreeVal(this, tab, hash, key, value);

        // 不是红黑树节点则说明为链表结点
        else {
            // 不断遍历到达链表尾部
            for (int binCount = 0;; ++binCount) {
                // 不断往链表后面走,若为空则说明到达尾部,直接添加节点
                if ((e = p.next) == null) {

                    p.next = newNode(hash, key, value, null);
                    // 结点数量达到阈值(默认为 8 ),执行 treeifyBin 方法
                    // 这个方法会根据 HashMap 数组来决定是否转换为红黑树。
                    // 只有当数组长度大于或者等于 64 的情况下,才会执行转换红黑树操作,以减少搜索时间。否则,就是只是对数组扩容。
                    if (binCount >= TREEIFY_THRESHOLD - 1) // -1 for 1st
                        treeifyBin(tab, hash);
                    // 跳出循环
                    break;
                }
                // 判断链表中结点的key值与插入的元素的key值是否相等
                if (e.hash == hash &&
                    ((k = e.key) == key || (key != null && key.equals(k))))
                // 相等,跳出循环
                    break;
                // 用于遍历桶中的链表,与前面的e = p.next组合,可以遍历链表
                p = e;
            }
        }
        // 表示在桶中找到key值、hash值与插入元素相等的结点
        if (e != null) {
            // 记录e的value
            V oldValue = e.value;
            // onlyIfAbsent为false或者旧值为null
            if (!onlyIfAbsent || oldValue == null)
            //用新值替换旧值
                e.value = value;
            // 访问后回调
            afterNodeAccess(e);
            // 返回旧值
            return oldValue;
        }
    }
    // 结构性修改
    ++modCount;
    // 实际大小大于阈值则扩容
    if (++size > threshold)
        resize();
    // 插入后回调
    afterNodeInsertion(evict);
    return null;
}HashMap的get方法的流程
整体逻辑和put也差不多,计算桶的位置,然后看看是那种数据结构,若是链表则遍历链表然后进行hashCode和equals方法比较是否一致然后返回,红黑树同理。
public V get(Object key) {
    Node < K, V > e;
    return (e = getNode(hash(key), key)) == null ? null : e.value;
}


final Node < K, V > getNode(int hash, Object key) {
    Node < K, V > [] tab;
    Node < K, V > first, e;
    int n;
    K k;
    if ((tab = table) != null && (n = tab.length) > 0 &&
        (first = tab[(n - 1) & hash]) != null) {
        // 数组元素相等
        if (first.hash == hash && // always check first node
            ((k = first.key) == key || (key != null && key.equals(k))))
            return first;
        // 桶中不止一个节点
        if ((e = first.next) != null) {

            // 若是红黑树,则走红黑树的遍历逻辑
            if (first instanceof TreeNode)
                return ((TreeNode < K, V > ) first).getTreeNode(hash, key);

            // 反之说明这是一个链表
            do {
                if (e.hash == hash &&
                    ((k = e.key) == key || (key != null && key.equals(k))))
                    return e;
            } while ((e = e.next) != null);
        }
    }
    return null;
}hashMap扩容机制
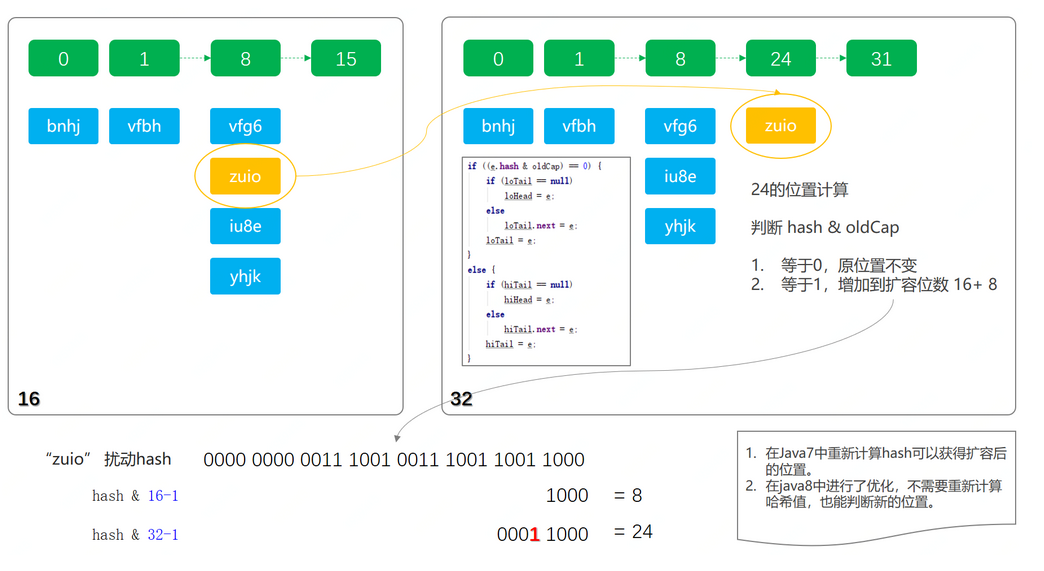
扩容方法整体做的就是数组迁移,注释都在下方,这里我们只需注意JDK核心设计,就是迁移的核心逻辑代码如下。 是JDK1.8中的优化操作,可以不需要再重新计算每一个元素的哈希值,如下图所示,将当前元素的hash值&容器旧的容量,如果高位有1则说明他要落到新的bucket中。
final Node < K, V > [] resize() {
    Node < K, V > [] oldTab = table;
    int oldCap = (oldTab == null) ? 0 : oldTab.length;
    int oldThr = threshold;
    int newCap, newThr = 0;

    // 计算扩容的容量以及新的阈值
    if (oldCap > 0) {
        if (oldCap >= MAXIMUM_CAPACITY) {
            threshold = Integer.MAX_VALUE;
            return oldTab;
        } else if ((newCap = oldCap << 1) < MAXIMUM_CAPACITY &&
            oldCap >= DEFAULT_INITIAL_CAPACITY)
            newThr = oldThr << 1; // double threshold
    } else if (oldThr > 0) // initial capacity was placed in threshold
        newCap = oldThr;
    else { // zero initial threshold signifies using defaults
        newCap = DEFAULT_INITIAL_CAPACITY;
        newThr = (int)(DEFAULT_LOAD_FACTOR * DEFAULT_INITIAL_CAPACITY);
    }
    if (newThr == 0) {
        float ft = (float) newCap * loadFactor;
        newThr = (newCap < MAXIMUM_CAPACITY && ft < (float) MAXIMUM_CAPACITY ?
            (int) ft : Integer.MAX_VALUE);
    }
    threshold = newThr;@
    SuppressWarnings({
        "rawtypes", "unchecked"
    })
    Node < K, V > [] newTab = (Node < K, V > []) new Node[newCap];
    table = newTab;
    if (oldTab != null) {
        for (int j = 0; j < oldCap; ++j) {
            //遍历,将旧链表元素迁移到新的链表上
        }
        while ((e = next) != null);
        //维护原来的尾节点
        if (loTail != null) {
            loTail.next = null;
            newTab[j] = loHead;
        }
        // 维护新扩容的尾节点
        if (hiTail != null) {
            hiTail.next = null;
            newTab[j + oldCap] = hiHead;
        }
    }
	return newTab;
}HashMap 的容量为什么需要是 2 的幂次方,而这个幂为什么是31呢?
先来回答第一个问题,容量为什么是2的幂次方,首先我们步入hashMap的源码中查看。hashMap计算键值对存到桶中索引位置的代码。
i = (n - 1) & hash在n为2的次幂情况下,(n - 1) & hash通过数学公式其实可以推导为 hash%n。
我们假设hash为1,使用不同的2次幂可以印证我们上面的论述。
1. n为2的2次方:  4===> 3&1==1%4
2. n为2的3次方:  8===> 7&1==1%8
3. .....除此之外,使用2的次幂进行计算时碰撞次数会少于非2的次幂。同样的,我们假设hash值的7、8、9、10。hashMap的容量n分别假设为8(2的3次方)和9。
n为16的计算结果如下,碰撞0次。
7===>7
8===>0
9===>1
10===>2n为9的计算结果,碰撞2次。
7===>0
8===>8
9===>8
10===>8再来了解一下hashCode的东西可以看到计算机hash的乘积数写死为31,这是为什么呢?
int hash = 0;
private char[] value;

public int hashCode() {

    int h = hash;
    if (h == 0 && value.length > 0) {
        char val[] = value;
        for (int i = 0; i < value.length; i++) {
            h = 31 * h + val[i];
        }
        hash = h;
    }
    return h;
}我们再来看看StackOverflow的回答:
The value 31 was chosen because it is an odd prime. If it were even and the multiplication overflowed, information would be lost, asmultiplication by 2 is equivalent to shifting. The advantage of using a prime is less clear, but it is traditional. A nice property of 31 is that the multiplication can be replaced by a shift and a subtraction for better performance: 31 * i == (i << 5) - i. Modern VMs do this sort of optimization automatically.
大意说的是如果使用双数的话,计算就是使用<<1,这样的计算很可能会出现数据溢出,使用奇数31则会JVM会将其优化成一个数学公式:31 * i == (i << 5) - i,如此依赖无论怎么计算hash值都不会超过int的最大值2^31-1 (0111 1111 | 1111 1111 | 1111 1111 | 1111 1111) ,那么问题又来了,别的小于31的奇数不会超过int的范围,为什么乘积数不用别的值而一定要用31呢?我们不妨写一个demo进行实验一下,不同的乘积数计算出的hash的值的碰撞数是多少
基于源码推导出hashCode优化后的公式,31 * i == (i << 5) - i 推导过程就在下方
public int hashCode(char[] value, int num) {
    hash = resetHash();
    int h = hash;
    if (h == 0 && value.length > 0) {
        char val[] = value;

        for (int i = 0; i < value.length; i++) {
            /**
             * 31 * h
             * ===> (2^5-1) * h
             * ====> (1<< 5-1 ) * h
             *  ===> (1<< 5) * h -h
             * 最终结果
             * ====> h << 5 - h
             * 从而避免计算溢出 以及使用位移提升性能
             */

            h = num * h + val[i];
        }
        hash = h;
    }
    return h;
}而且乘积数为为是31还有下面两个好处:
- 冲突最少。
31计算的值都在取值范围内。
对此,笔者使用了下面这段代码印证这个结果:
private int hash;

public int hashCode(char[] value, int num) {
    hash = resetHash();
    int h = hash;
    if (h == 0 && value.length > 0) {
        char val[] = value;

        for (int i = 0; i < value.length; i++) {
            /**
             * 31 * h
             * ===> (2^5-1) * h
             * ====> (1<< 5-1 ) * h
             *  ===> (1<< 5) * h -h
             * 最终结果
             * ====> h << 5 - h
             * 从而避免计算溢出 以及使用位移提升性能
             */

            h = num * h + val[i];
        }
        hash = h;
    }
    return h;
}

private int resetHash() {
    return 0;
}

@Test
public void hashCodeTest() {
    int size = 1000 _0000;
    caculHashCode(size, 2);
    caculHashCode(size, 4);
    caculHashCode(size, 7);
    caculHashCode(size, 31);
    caculHashCode(size, 32);
    caculHashCode(size, 33);
    caculHashCode(size, 64);
    /**
     * 输出结果 31碰撞率低 31之后的质数也行 但是最大值超过int 范围了
     * 2:重复了9997896
     * 4:重复了9939942
     * 7:重复了8696061
     * 31:重复了0
     * 32:重复了5900000
     * 33:重复了8
     * 64:重复了9590000
     */


}

private void caculHashCode(int size, int num) {
    HashSet < Integer > set2 = new HashSet < > ();
    for (int i = 0; i < size; i++) {
        set2.add(hashCode(String.valueOf(i).toCharArray(), num));
    }
    System.out.println(num + ":重复了" + (size - set2.size()));
}总结一下:
- 通过2的次幂使得公式,可以使得公式变为取模运算,提升计算效率。
- 次幂为31计算结果永远小于int类型避免计算溢出,在int类型区间中31次幂碰撞率最低。
重写equals为什么要重写hashcode?
我们在日常开发中,某些情况下我们判断对象是否相等需要有自己的一套逻辑,这时候我们就需要重写equals方法,但我们在重写equals方法时不重写hashCode方法,很可能会造成很严重的集合操作事故。
我们以以这样的一个场景为例,由于业务的需要,我们判断产品对象的逻辑需要重写,只有id相等的产品对象才是相等的对象。所以我们重写了产品对象的equals方法,关键代码如下所示:
import java.util.HashSet;
import java.util.Objects;

public class Product {
    private Integer id;
    private String name;

    public Product(Integer id, String name) {
        this.id = id;
        this.name = name;
    }

    @Override
    public String toString() {
        return "Product{" +
                "id=" + id +
                ", name='" + name + '\'' +
                '}';
    }

    // 重写equals
    @Override
    public boolean equals(Object o) {
        if (this == o) {
            return true;
        }
        if (o == null || getClass() != o.getClass()) {
            return false;
        }
        Product product = (Product) o;
        return Objects.equals(id, product.id);
    }


}这时候有个场景要求我们对产品进行去重操作,代码以及运行结果如下所示,可以看到明明是两个我们逻辑上相同的产品却都被存到set集合中,这是为什么呢?我们不妨看看set的add源码
public static void main(String[] args) {
        Product product1 = new Product(1, "id为1的馒头旧版本");
        Product product2 = new Product(1, "id为1的馒头新版本");


        HashSet<Product> products = new HashSet<Product>();
        boolean contains = products.contains(product1);
        products.add(product1);
        products.add(product2);
        // 使用equals判断是否相等
        System.out.println(product1.equals(product2));
        // 查看HashSet中元素个数
        System.out.println(products.size());
        for (Product product : products) {
            System.out.println(product.toString());
        }
    /**
         * true
         * 2
         * Product{id=1, name='id为1的馒头旧版本'}
         * Product{id=1, name='id为1的馒头新版本'}
         */


}首先我们debug到add代码没有问题继续往下看
public boolean add(E e) {
    return map.put(e, PRESENT) == null;
}可以看到put代码中有一个关于hash的函数,我们不妨点进去看看
public V put(K key, V value) {
    return putVal(hash(key), key, value, false, true);
}可以看到这个hash就是使用key的hashCode进行计算得到一个值,而这个key在debug中我们可以看到就是我们需要添加到集合中的对象
static final int hash(Object key) {
     int h;
     return (key == null) ? 0 : (h = key.hashCode()) ^ (h >>> 16);
}经过debug发现第二次插入操作就会经过hash计算得到上一个元素插入的位置,
final V putVal(int hash, K key, V value, boolean onlyIfAbsent,
        boolean evict) {
        Node < K, V > [] tab;
        Node < K, V > p;
        int n, i;
        if ((tab = table) == null || (n = tab.length) == 0)
            n = (tab = resize()).length;
        if ((p = tab[i = (n - 1) & hash]) == null)
            tab[i] = newNode(hash, key, value, null);
        else {
            Node < K, V > e;
            K k;
            //如果hash相同且对象相等则走这段逻辑,设置一个值直接返回不进行插入操作
            if (p.hash == hash &&
                ((k = p.key) == key || (key != null && key.equals(k))))
                e = p;
            //否则进行插入操作
            else if (p instanceof TreeNode)
                e = ((TreeNode < K, V > ) p).putTreeVal(this, tab, hash, key, value);
            else {
                for (int binCount = 0;; ++binCount) {
                    if ((e = p.next) == null) {
                        p.next = newNode(hash, key, value, null);
                        if (binCount >= TREEIFY_THRESHOLD - 1) // -1 for 1st
                            treeifyBin(tab, hash);
                        break;
                    }

                    if (e.hash == hash &&
                        ((k = e.key) == key || (key != null && key.equals(k))))
                        break;
                    p = e;
                }
            }
            //.......
}HashMap 常见遍历以及安全删除代码要怎么做?
示例代码如下,读者可自行调试,大抵是建议使用entrySet,以及在循环时安全删除建议使用entrySet的迭代器形式:
private static HashMap<String, String> map = new HashMap();

    @Before
    public void before() {
        int size = 1000_0000;
        for (int i = 0; i < size; i++) {
            map.put(String.valueOf(i), String.valueOf(i));
        }
    }

    @Test
    public void CycleTest() {
        long start = System.currentTimeMillis();
        Iterator<Map.Entry<String, String>> iterator = map.entrySet().iterator();
        while (iterator.hasNext()) {
            Map.Entry<String, String> entry = iterator.next();
            String key = entry.getKey();
            String value = entry.getValue();
        }
        long end = System.currentTimeMillis();
        System.out.println("entry iterator遍历:" + (end - start));


        start = System.currentTimeMillis();
        Iterator<String> keySetIterator = map.keySet().iterator();
        while (keySetIterator.hasNext()) {
            String key = keySetIterator.next();
            String value = map.get(key);

        }
        end = System.currentTimeMillis();
        System.out.println("keySet Iterator遍历:" + (end - start));

        start = System.currentTimeMillis();
        for (Map.Entry<String, String> entry : map.entrySet()) {
            String key = entry.getKey();
            String value = entry.getValue();
        }
        end = System.currentTimeMillis();
        System.out.println("entrySet 遍历:" + (end - start));


        start = System.currentTimeMillis();
        for (String key : map.keySet()) {
            String resultKey = key;
            String value = map.get(key);
        }
        end = System.currentTimeMillis();
        System.out.println("foreach keyset 遍历:" + (end - start));


        start = System.currentTimeMillis();
        map.forEach((k, v) -> {
            String key = k;
            String value = v;
        });
        end = System.currentTimeMillis();
        System.out.println("lambda 遍历:" + (end - start));


        start = System.currentTimeMillis();
        map.entrySet().stream().forEach((entry)->{
            String key=entry.getKey();
            String value=entry.getValue();
        });
        end = System.currentTimeMillis();
        System.out.println("stream 遍历:" + (end - start));


        start = System.currentTimeMillis();
        map.entrySet().parallelStream().forEach((entry)->{
            String key=entry.getKey();
            String value=entry.getValue();
        });
        end = System.currentTimeMillis();
        System.out.println("并行流 遍历:" + (end - start));

        /**
         * 输出结果 entrySet性能最好
         * entry iterator遍历:228
         * keySet Iterator遍历:284
         * entrySet 遍历:228
         * foreach keyset 遍历:284
         * lambda 遍历:237
         * stream 遍历:230
         * 并行流 遍历:134
         */


        /**
         * 两个entry反编译的字节码一样说明时长一样
         * long start = System.currentTimeMillis();
         *
         *         Entry entry;
         *         String var6;
         *         for(Iterator iterator = map.entrySet().iterator(); iterator.hasNext(); var6 = (String)entry.getValue()) {
         *             entry = (Entry)iterator.next();
         *             String key = (String)entry.getKey();
         *         }
         *
         *         long end = System.currentTimeMillis();
         *         System.out.println("entry iterator遍历:" + (end - start));
         *
         *
         *          start = System.currentTimeMillis();
         *
         *         String var10;
         *         Iterator var13;
         *         Entry entry;
         *         for(var13 = map.entrySet().iterator(); var13.hasNext(); var10 = (String)entry.getValue()) {
         *             entry = (Entry)var13.next();
         *             String key = (String)entry.getKey();
         *         }
         *
         *         end = System.currentTimeMillis();
         *         System.out.println("entrySet 遍历:" + (end - start));
         */


        /**
         * 安全删除
         */
        Iterator<Map.Entry<String, String>> it = map.entrySet().iterator();
        while (it.hasNext()) {
            Map.Entry<String, String> entry = it.next();
            if (entry.getKey() .equals("1") ) {
                // 删除
                System.out.println("del:" + entry.getKey());
                iterator.remove();
            } else {
                System.out.println("show:" + entry.getKey());
            }
        }
}HashMap多线程可能导致的问题
具体可以参考笔者这篇文章,大致原因是JDK7版本的HashMap在多线程扩容期间,一个线程指向迁移节点后被挂起,另一个线程完成扩容后。这个线程重新那会CPU执行权在执行原有的迁移逻辑,会造成死循环进而打爆CPU 100%s问题,而JDK8则可能会导致同一个两个key计算到相同的hash值进而导致后put的元素将前一个元素覆盖。
更多可以参考笔者写的这篇文章:
HashMap与红黑树的详解
具体可以参考笔者写的这篇文章:
数据结构与算法之红黑树小结(opens new window)
如果读者想更加直观查看红黑树生成过程可以看看这个网站
Red/Black Tree Visualization(opens new window)
参考文献
[hashCode为什么使用31作为乘积数(opens new window)](https://bugstack.cn/md/java/interview/2020-08-04-面经手册 · 第2篇《数据结构,HashCode为什么使用31作为乘数?》.html)
重写equals为什么要重写hashCode(opens new window)
HashMap源码&底层数据结构分析(opens new window)