 XfyCoding博客
基于VitePress搭建个人博客
vitepress 官网
vitepress 中文翻译网站 (中文翻译网站内容是残缺的)
快速搭建VitePress
步骤 1: 创建并进入一个目录
sh$ mkdir vitepress-starter $ cd vitepress-starter步骤 2: 初始化
sh$ npm init步骤 3: 本地安装 VitePress
sh$ npm add --dev vitepress步骤 4: 创建你第一篇文档
sh$ mkdir docs $ echo '# Hello VitePress' > docs/index.md步骤 5: 在
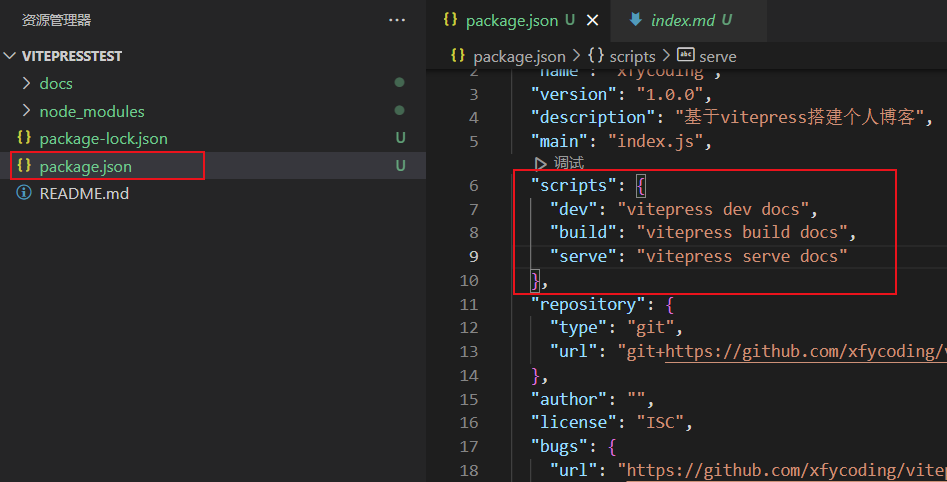
package.json.添加一些scriptsh{ "scripts": { "dev": "vitepress dev docs", "build": "vitepress build docs", "serve": "vitepress serve docs" } }具体位置如下图:
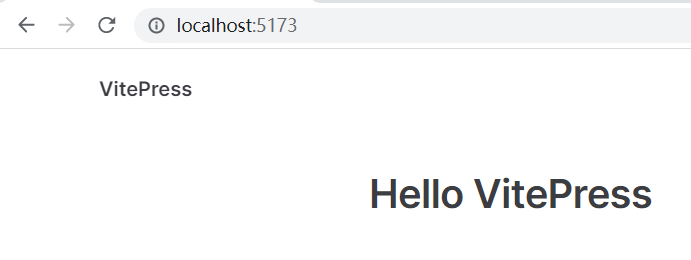
步骤 6: 在本地服务器上启动文档站点
sh$ npm run dev
到这一步就已经搭建好了,如果有乱码,修改相对于的文件编码即可,最终效果图如下:
配置vitepress
项目结构
.
├─ docs
│  ├─ .vitepress
|  |  ├─ components (可选的)
|  |  ├─ theme (可选的)
|  |  |  └─ index.js
│  │  └─ config.js
|  ├─ public (可选的)
│  └─ index.md
└─ package.json这是主要文件夹的功能分析:
.vitepress主要处理全局配置以及自定义主题以下是config.js 默认初始代码,建议直接复制
jsexport default { // 定义在浏览器标签上显示的标题 title: "xfycoding", // 大部分主要的主题配置都在里面了 description: '一枚努力学习的程序员', //根路径 base: '/blog/', //开启最后编辑时间 lastUpdated: true, themeConfig: { //网页logo logo: '/img/home/Xfycoding.jpg', // 导航上显示的内容 siteTitle: 'XfyCoding博客', // 配置顶部的文字(不配置则是英文) outlineTitle: '文章目录', // 表示显示h2-h6的标题 outline: 'deep', //最后编辑时间内容 lastUpdatedText: 'Updated Date', socialLinks: [ { icon: "github", link: "https://github.com/Xfycoding" } ], //页脚 footer: { message: 'XfyCoding', copyright: 'Copyright ©2023-present XfyCoding 版权所有' }, //上(下)一篇 docFooter: { prev: '上一篇', next: '下一篇' }, // //导航栏 // nav: [ // { text: '首页', link: '/' }, // { text: '搭建个人博客', link: '/articles/搭建个人博客/基于VitePress搭建个人博客' }, // { // text: '下拉菜单', // items: [ // { text: '项目A', link: '/articles/下拉菜单/a' }, // { text: '项目B', link: '/articles/下拉菜单/b' } // ] // }, // { // text: '分组下拉菜单', // items: [ // { // // 可以省略标题 // text: '标题A', // items: [ // { text: '标题A项目A', link: '/articles/组合下拉菜单/组合a/a' }, // { text: '标题A项目B', link: '/articles/组合下拉菜单/组合a/b' }, // ] // }, // { // // 可以省略标题 // text: '标题B', // items: [ // { text: '标题B项目A', link: '/articles/组合下拉菜单/组合b/a' }, // { text: '标题B项目B', link: '/articles/组合下拉菜单/组合b/b' }, // ] // } // ] // } // ], // //侧边栏 // sidebar: { // '/articles/搭建个人博客/': [ // { // text: 'Guide', // items: [ // { text: '搭建个人博客1', link: '/articles/搭建个人博客/基于VitePress搭建个人博客' }, // { text: '搭建个人博客2', link: '/articles/搭建个人博客/测试' }, // ] // } // ], // }, // 简洁化URL,即我们访问文件时不需要加后缀了,直接 /xxx/xxx即可,不要/xxx/xxx.md cleanUrls: true, } };components存放vue组件theme自定义主题public静态资源存放index.md作为起始页
Frontmatter
任何包含YAML frontmatter块的Markdown文件都将由gray-matter处理。Frontmatter块必须位于在Markdown文件的顶部,必须是有效的YAML格式,放置在三点划线之间。例如:
---
title: Docs with VitePress
editLink: true
---在三点划线之间,你可以设置预定义变量,甚至可以创建自定义变量。这些变量可以通过$frontmatter调用。
这是一个如何在Markdown文件使用预定义变量的例子:
---
title: Docs with VitePress
editLink: true
---

# {{ $frontmatter.title }}

基于VitePress搭建个人博客vitepress 支持三种格式的布局,不同布局对应不同特性
doc布局:基础文档布局,一般的 markdown 文件都使用该头部字段page布局:自定义页面用的home布局:起始页布局,一般特定用在根目录下的 index.md,将其作为起始页使用
VitePress也支持JSON格式的frontmatter,需要以花括号开始和结尾。
---
{
  "title": "Blogging Like a Hacker",
  "editLink": true
}
---首页配置
将docs文件夹下的index.md文件进行配置
---
layout: home
title: 基于VitePress搭建个人博客标题
titleTemplate: 基于VitePress搭建个人博客描述
hero:
  name: 基于VitePress搭建个人博客
  text: 适用于上下或左右分栏风格的布局
  tagline: 基于vue3, 仅支持现代浏览器,简洁、易扩展、好用
  image:
    src: /img/home/Xfycoding.jpg
    alt: 基于VitePress搭建个人博客
  actions:
    - theme: brand
      text: 开始
      link: /
    - theme: alt
      text: 获取源代码
      link: https://github.com/xfycoding/vitepresstest

features:
   - icon: 🛠️
     title: 基于VitePress搭建个人博客
     details: 基于VitePress搭建个人博客
     link: /
   - icon: 🪒
     title: 基于VitePress搭建个人博客1
     details: 基于VitePress搭建个人博客1
     link: /
   - icon: 💯
     title: 基于VitePress搭建个人博客2
     details: 基于VitePress搭建个人博客3
     link: /
---关于上面 Frontmatter 的几点说明:
- layout:支持 doc、home、page 三个值,这里使用 home 布局;
- title 和 titleTemplate:在浏览器标签页上面显示;
- hero的image是public文件夹的路径
- features 中的 icon 目前只支持 emojis 图标。
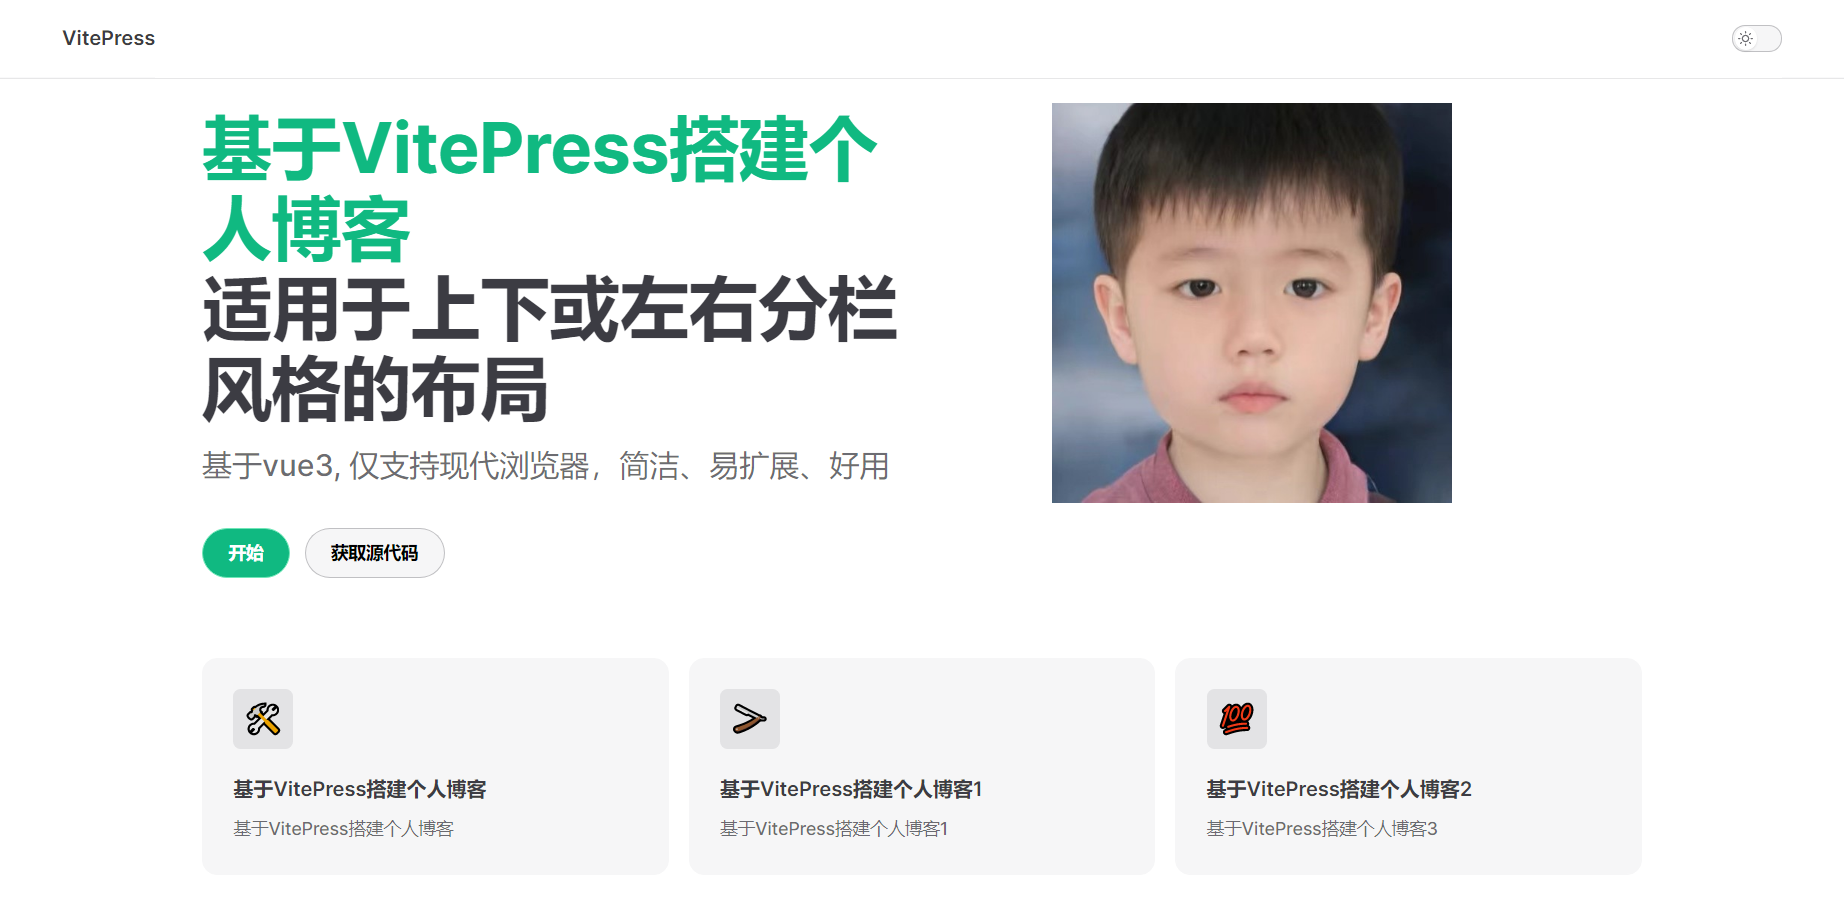
最终效果图如下:
导航
Nav 是显示在页面顶部的导航栏,包含网站标题、全局菜单连接等。
- 网站标题和 Logo
默认情况下,导航是根据config.title的值显示网站的标题。如果你想改变导航上显示的内容,你可以在themeConfig.siteTitle选项中定义自定义文本。
export default {
  themeConfig: {
    siteTitle: 'XfyCoding博客'
  }
}如果你的网站有一个 LOGO,你可以通过传入图片的路径来显示它。你应该把 LOGO 直接放在public目录中,并定义它的绝对路径。
export default {
  themeConfig: {
    logo: '/img/home/Xfycoding.jpg'
  }
}当添加一个 LOGO 时,它将与网站标题一起显示。如果只想显示 LOGO,并且想隐藏网站的标题文本,请在siteTitle选项中设置false。
export default {
  themeConfig: {
    logo: '/img/home/Xfycoding.jpg',
    siteTitle: false
  }
}- 导航链接
你可以定义themeConfig.nav选项来给导航添加链接。
export default {
  themeConfig: {
    nav: [
      { text: '首页', link: '/' },
      { text: '搭建个人博客', link: '/articles/搭建个人博客/基于VitePress搭建个人博客' }
    ]
  }
}text是显示在导航中的实际文本。link是点击导航后跳转的页面地址。设置link为实际文件所在目录的位置,不带.md后缀,并且总以/开头。
使用 items 选项可以设置下拉菜单形式的导航链接:
export default {
  themeConfig: {
    nav: [
      { text: '首页', link: '/' },
      { text: '搭建个人博客', link: '/articles/搭建个人博客/基于VitePress搭建个人博客' },
      {
        text: '下拉菜单',
        items: [
          { text: '项目A', link: '/articles/下拉菜单/a' },
          { text: '项目B', link: '/articles/下拉菜单/b' }
        ]
      }
    ]
  }
}注意:下拉菜单的一级标题不能使用link属性,因为它变成了一个打开下拉框的按钮。
也可以通过传递更多的嵌套来进一步为下拉菜单添加 "分组"。
export default {
  themeConfig: {
    nav: [
      { text: '首页', link: '/' },
      { text: '搭建个人博客', link: '/articles/搭建个人博客/基于VitePress搭建个人博客' },
      {
        text: '下拉菜单',
        items: [
          { text: '项目A', link: '/articles/下拉菜单/a' },
          { text: '项目B', link: '/articles/下拉菜单/b' }
        ]
      },
      {
        text: '分组下拉菜单',
        items: [
          {
            // 可以省略标题
            text: '标题A',
            items: [
              { text: '标题A项目A', link: '/articles/组合下拉菜单/组合a/a' },
              { text: '标题A项目B', link: '/articles/组合下拉菜单/组合a/b' },
            ]
          },
          {
            // 可以省略标题
            text: '标题B',
            items: [
              { text: '标题B项目A', link: '/articles/组合下拉菜单/组合b/a' },
              { text: '标题B项目B', link: '/articles/组合下拉菜单/组合b/b' },
            ]
          }
        ]
      }
    ]
  }
}- 自定义链接的 “active” 状态
当当前页面在匹配的路径下时,导航菜单项将被突出显示。如果你想自定义要匹配的路径,请定义activeMatch属性和regex作为一个字符串值。
export default {
  themeConfig: {
    nav: [
      {
        text: '搭建个人博客',
        link: '/articles/搭建个人博客/基于VitePress搭建个人博客',
        activeMatch: '/articles/下拉菜单/a/'
      }
    ]
  }
}activeMatch 预计是一个 regex 字符串,但你必须把它定义为一个字符串。我们不能在这里使用实际的正则表达式对象,因为它在构建时不能被序列化。
侧边栏
侧边栏是网站的主要导航块。你可以在themeConfig.sidebar中配置侧边栏菜单。
export default {
  themeConfig: {
    sidebar: [
      {
        text: 'TitleA',
        items: [
          { text: 'ItemA', link: '/item-a' },
          { text: 'ItemB', link: '/item-b' },
          ...
        ]
      }
    ]
  }
}- 基本配置
边栏菜单的最简单形式是传入一个单一的链接数组。第一层项目定义了侧边栏的分组Section。它应该包含text,这是分组的标题,items作为实际导航链接的。
export default {
  themeConfig: {
    sidebar: [
      {
        text: 'TitleA',
        items: [
          { text: 'ItemA', link: '/item-a' },
          { text: 'ItemB', link: '/item-b' },
          ...
        ]
      },
      {
        text: 'TitleB',
        items: [
          { text: 'ItemA', link: '/item-a' },
          { text: 'ItemB', link: '/item-b' },
          ...
        ]
      },
    ]
  }
}如果你在link的末尾添加尾部斜线,它将显示相应目录的index.md。否则就是响应的.md文件,VitePress 会自动将.md转换成.html,所以不必添加.md后缀。
export default {
  themeConfig: {
    sidebar: [
      {
        text: 'TitleA',
        items: [
          // 这里显示的是 `/TitleA/index.md` 页面.
          { text: 'ItemA', link: '/TitleA/' }
        ]
      }
    ]
  }
}- 多个侧边栏
你可以根据页面路径来显示不同的侧边栏。例如,如VitePress官方网站那样,你可能想在你的文档中创建一个单独的内容部分,如 "指南 "页和 "配置 "页。
要做到这一点,首先要把你的页面组织成每个所需分组Section的目录。
.
├─ TitleA/
│  ├─ one.md
│  ├─ two.md
│  └─ three.md
└─ TitleB/
   ├─ one.md
   ├─ two.md
└─ three.md然后,更新你的配置,为每个分组Section定义你的侧边栏。现在,你应该传递一个对象而不是一个数组。
export default {
  themeConfig: {
    sidebar: {
      '/TitleA/': [
        {
          text: 'TitleA',
          items: [
            // This shows `/guide/index.md` page.
            { text: 'Index', link: '/TitleA/' }, // /TitleA/index.md
            { text: 'One', link: '/TitleA/one' }, // /TitleA/one.md
            { text: 'Two', link: '/TitleA/two' } // /TitleA/two.md
          ]
        }
      ],
      '/TitleB/': [
        {
          text: 'TitleB',
          items: [
            { text: 'Index', link: '/TitleB/' }, // /TitleB/index.md
            { text: 'One', link: '/TitleB/one' }, // /TitleB/one.md
            { text: 'Two', link: '/TitleB/two' } // /TitleB/two.md
          ]
        }
      ]
    }
  }
}- 可收缩的侧边栏
通过向侧边栏组添加collapsible选项,会显示了一个切换按钮来隐藏/显示每个分组。如当前页面左侧侧边栏。
export default {
  themeConfig: {
    sidebar: [
      {
        text: 'TitleA',
        collapsible: true,
        items: [...]
      },
      {
        text: 'TitleB',
        collapsible: true,
        items: [...]
      }
    ]
  }
}所有分组默认都是展开状态的。如果你想让它们在初始页面加载时是关闭收缩状态,请将collapsible选项设置为true。
export default {
  themeConfig: {
    sidebar: [
      {
        text: 'TitleA',
        collapsible: true,
        collapsed: true,
        items: [...]
      }
    ]
  }
}在 "vitepress": "^1.0.0-alpha.4" 版本及之前 需要注意的是,如果没有添加
collapsible选项是不会出现收缩展开功能按钮的。
右侧边栏
export default {
  themeConfig: {
    // 配置顶部的文字(不配置则是英文)
    outlineTitle: '文章目录',
    // 表示显示h2-h6的标题
    outline: 'deep'
    }
  }
}上(下)一篇
你可以自定义上一篇和下一篇链接的文本。如果你想在上一篇/下一篇链接上显示与你的侧边栏上不同的文字,这很有帮助。
export default {
  themeConfig: {
    //上(下)一篇
    docFooter: {
      prev: '上一篇',
      next: '下一篇'
    }
  }
}最后编辑时间
通过提交代码来确定最后的编辑时间
export default {
  //开启最后编辑时间
  lastUpdated: true
  themeConfig: {
    //最后编辑时间内容
    lastUpdatedText: 'Updated Date'
  }
}页脚
选项themeConfig.footer被设置后,将在 VitePress 页面底部显示全局页脚。
export default {
  themeConfig: {
    footer: {
      message: 'Released under the MIT License.',
      copyright: 'Copyright © 2019-present Evan You'
    }
  }
}